Fractal Wood burning, also known as creating Lichtenberg figures is the art of burning lightning or tree like figures into wood using high voltage electricity. The high voltage electricity is generated by a transformer, usually a microwave oven transformer, a neon sign transformer or an oil burner transformer. These machines are very dangerous and potentially deadly if you make a mistake when using them. I do not recommend that anyone do this due to the danger involved. I am aware of the risk and have chosen to take it. I will provide information and tips on how I made my wood burning machine and my technique that I use burning Lichtenberg figures. If you do decide to take up this hobby, please be careful and educate yourself on how the systems work and of the dangers.
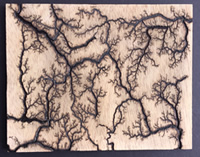
Fractal wood burning is a process of applying an electrically conductive solution on wood and then applying high voltage electricity through a transformer using two probes. When this electricity is applied, it burns in the wood from one probe to the other. The figures that are created are commonly called Lichtenberg figures or fractal burns. These burns create a lightning like image that is burnt into the wood.
Transformers
The high voltage electricity is provided by some type of a transformer. These transformers are powered by 120 volts and can create between 2000 and 15000 volts once the electricity comes out of the transformer. The most common type of transformer used is a microwave oven transformer (referred to as a MOT), with others being neon sign transformers and oil burner transformers.
These are usually have an output of 2000 volts with around .5 amps, which is very high and dangerous. A microwave like the RCA RMW733 has 700 watts with 2000v output voltage. Using the A=P/V formula it would have 700/2000=.35 amps or 350ma's. This type of transformer has one of the lowest amounts of voltage output, but burns very aggressively due to the comparatively high amperage. This high amperage also makes this the most dangerous of the three types to use. These transformers are also usually salvaged out of a microwave and the unit itself is a shock hazard since connections are exposed, especially the second probe that is basically just grounded to the transformer itself. They can be one of the cheapest to obtain though. Many are salvaged out of a microwave that no longer works but the transformer is still fine. The burn pattern from the MOT is very aggressice and can burn a very wide and deep pattern.
Neon Sign Transformers are usually between 9000 and 15000 volts, but the most common ones are around 12000 volts. The have much lower amperage than the MOT, usually around 35ma. Remember that 1 amp is equal to 1000 ma, so the microwave we referenced earlier would be 350ma's, 10 times more amperage than the neon sign transformer. The neon transformer will burn a lot more detail, but burns slower. It is much easier to control the burn with these and though still very dangerous, are somewhat safer due to the lower amperage. The connections on these can also be made in a safer manner due to the fact that no lead is grounded to the exposed unit.
Most Oil Burner Transformers are 10,000 volts and have 23ma. They burn very similar to the neon sign transformers, but maybe just a little less aggressive due to the even lower amperage of 23ma’s. They will burn detail very good, but do not branch out as good as the MOT. If you go strictly be voltage and amperage, they are probably the safest of the three. AGAIN, remember these are all very dangerous and you run the risk of serious injury or even death by using one of them. At this point the oil burner transformer is what I use, but I intend on eventually making a unit with all three types of transformers.
There are many other factors that go into building one of these units safely and making the best burns you can. I have many videos on my DoubleReno YouTube Channel showing things such as how to make the conductive solution and a full video on how I made my oil burner Lichtenberg burner. I also have many videos of me burning different types of woods and some tips on how to make your burns better. I will be following up soon with an article and video of how I made my cables that I use, so watch for that.
JUST REMEMBER,,just because one type of transformer is possibly "safer" than the other, dont be fooled. They are all very dangerous and most likely you would only get one mistake. A mistake can seroiusly injure you and there is a good chance it could kill you. If you do decide to use any of these devices, please be careful.
I burned Lichtenberg Figures in a Slab of Cedar Wood I got from the saw mill. I had tried a piece of this wood before with poor results, I figured some things out this time and got a great fractal burn on this one. I used my oil burner Lichtenberg Burning machine to burn it.
Feature Video
Making a Lichtenberg Wood Burning Machine from a Microwave Transformer
I made a Lichtenberg wood burning machine from a microwave transformer. I show in great detail from removing the transformer from the microwave to actually doing a burn with the device. This is very dangerous and I do not recommend you try it. A mistake with this device can result in serious injury or death. I just show you how I made mine and the extra steps I take to make my device as safe as possible. I made my cables for the Lichtenberg wood burner in a separate video to try and keep the length down.
Here is a link to that video: Lichtenberg Burner Cable
The cable video also has some link to some of the materials I used to build my machine.
Lichtenberg Burning Probes: To Touch or Not to Touch
I have seen two distinct styles of using the probes when using a Lichtenberg burner. Some people build “insulated” probes and hand hold them. The reasoning for this, from what I hear, is to give you more control. You are able to move the probes to a new area or the board at any time and better control the burn pattern. The other method is a hands-off method with probes that are designed to sit on the table of the board and make contact without ever touching them while the device is powered up.
Hands On Probes
I have seen anything from sticks of PVC with wires taped onto the ends with electrical tape to wooden poles with conductive rods on the working end and the cables connected with screws, clamps or soldered on. I have seen combination sets that have one probe that is hands off and the other one is one they hold. The rationale for this is if you get shocked by the one in your hand, the current won’t pass through your heart trying to get to the probe in the other hand. The problem with these setups in my opinion is that you are a very short distance from 2000-15000 volts of electricity and trusting whatever you have made your handle out of to protect you from that electricity. What if something startles you and you drop that probe? If something goes wrong and you are not using a Deadman switch, how do you kill the power to the unit?
Hands Off Probes
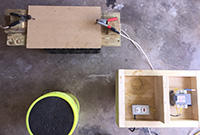
I have seen some ingenious setups for probes that are hands off, PVC pipe with a probe that is balanced to keep the probe weighted on the board, my setup, which is clamps soldered onto the cable and using a brass or copper rod in the clamps to make contact, ad some as simple as a nail or screw in the board with a wire wrapped around it. The thing all of these have in common is that you do not have to make contact with any part of the machine while it is powered up. You can set your probes up while the machine is off, get at a comfortable distance and then power the machine up. If you want to move your probes, you simply turn off the machine, move them and then turn it back on.
The only true advantage I can imagine of hands on probes could be if you were doing round pieces and it would be difficult to get a hands-free probe to stay on the round surface. With a little ingenuity, that could be done with a hands-off probe too. We all know using these devices are very dangerous so, the question you have to ask yourself is, is it worth saving a few minutes on a burn by holding these high voltage probes in your hand or not.
I burned Lichtenberg figures in an Oak Burl, at least I call it a burl its actually the side of the tree where a few limbs branched out, but the grain looks like a burl. This piece took a lot of prep, but was worth it. I even finished this piece with wipe on poly in the video after cleaning it and bleaching it. Probably one of the nicest pieces I have ever done. Hope you enjoy it!
Thanks for watching.
Here is a link to the Wipe on Poly that I finished it with.
Here is a link to the Wood Bleach I use
My new Facebook page
Fractal wood burning * Lichtenberg figures * Lichtenberg Wood Burning * Fractal Burns * Pyrography art *
I have several projects and experiments that I am working on. One of the questions I get asked a lot about is bleaching of the wood after I do a burn. I am going to burn several different types of wood and use wood bleach on them all, with before and after shots. This will let everyone see the difference of the projects after they have been bleached.
Next I am going to do a few burns in different woods and try three different finishes on them. I have used Clear Poly, Tung Oil and Boiled Linseed Oil, all with varying degrees of success. My plan is to finish several boards with all three finishes so I can do a true comparison. I will post both of these as soon as I complete them and will also post a video on my YouTube channel! I am also working on a gallery of some of my finished projects so stay tuned!